
Building Apps with World ID
How to build a sybil-resistant app with World ID device authentication


You can test out the app we’ll be building in this tutorial here. The final codebase is here.
World ID enables you to prove you’re a unique and real human on the internet while keeping your identity private.
For developers, this translates to providing a means of sybil resistance that is becoming both increasingly important, and more challenging, in a world of accelerating AI and automation.
I’ve experimented with many sybil resistance solutions in the past such as GitCoin Passport and the tradeoffs in UX and usability seem very challenging, and there doesn’t yet seem to be a silver bullet, but I feel like World ID’s approach is quite promising.
In the past, WorldCoin brought to mind The Orb, which was controversial to some people and therefore not something that could be used today, at scale, as a single means of identity verification for any app wanting to scale globally in a permissionless fashion.
This is not the case today, as anyone with a mobile device can use the WorldID App to provide unique credentials that would be orders of magnitude harder and more expensive to sybil attack than traditional methods like social authentication or anything on-chain, without the Orb.
Identity methods
There are 3 different authentication methods available through World ID
World ID Device
Allows apps to accept World IDs that haven't yet been verified with an Orb, but are held on trusted devices. This us useful in lower stake scenarios.
This is the method we’ll be using in this tutorial.
World ID Orb
Orbs are devices that verify humanness and uniqueness. The classic Orb signal allows users to prove they are holding an Orb-verified World ID on a trusted device. This is more secure than device only verification.
World ID Orb+
To enable higher security, apps can require face authentication when using World ID, similar to unlocking your phone. This ensures only the issued person can use their ID for that action. Authentication is performed locally on the user’s device thanks to Personal Custody.
Use Cases
User Verification
Use World ID to verify your existing user base if you already have users, or offer a way for users to sign up in another fashion.
User Sign in
Use World ID as an authentication method similar to how you might use Google , Facebook, or GitHub login.
User Actions
Incognito Actions verify arbitrary action a user might take in your app, where each action is independent of other actions. Here are some examples:
Claiming a one-time discount for a purchase (each discount is independent of other discounts)
Allowing users to vote in a poll, but only vote per user (each vote is independent, votes from the same person cannot be linked)
Sharing an invitation to join a platform, limited to five total invites
Similarly to how you might confirm or manage this type of authorization in a database, WorldID
What we’re building
We’ll be building a simple app that allows users to sign in to an app using their mobile device.
We’ll verify the user on the server using the WorldID API, and integrate it client-side using the World ID ID Kit SDK for React.
The user will also be given the option to also connect their wallet to fetch their social profile from Lens or Farcster using Airstack’s API.

We’ll be going the extra mile and adding some nice styling using the ShadCN UI library which is easy to set up with a new Next.js project.
Let’s start building.
Prerequisites
To follow along, you’ll need the following credentials.
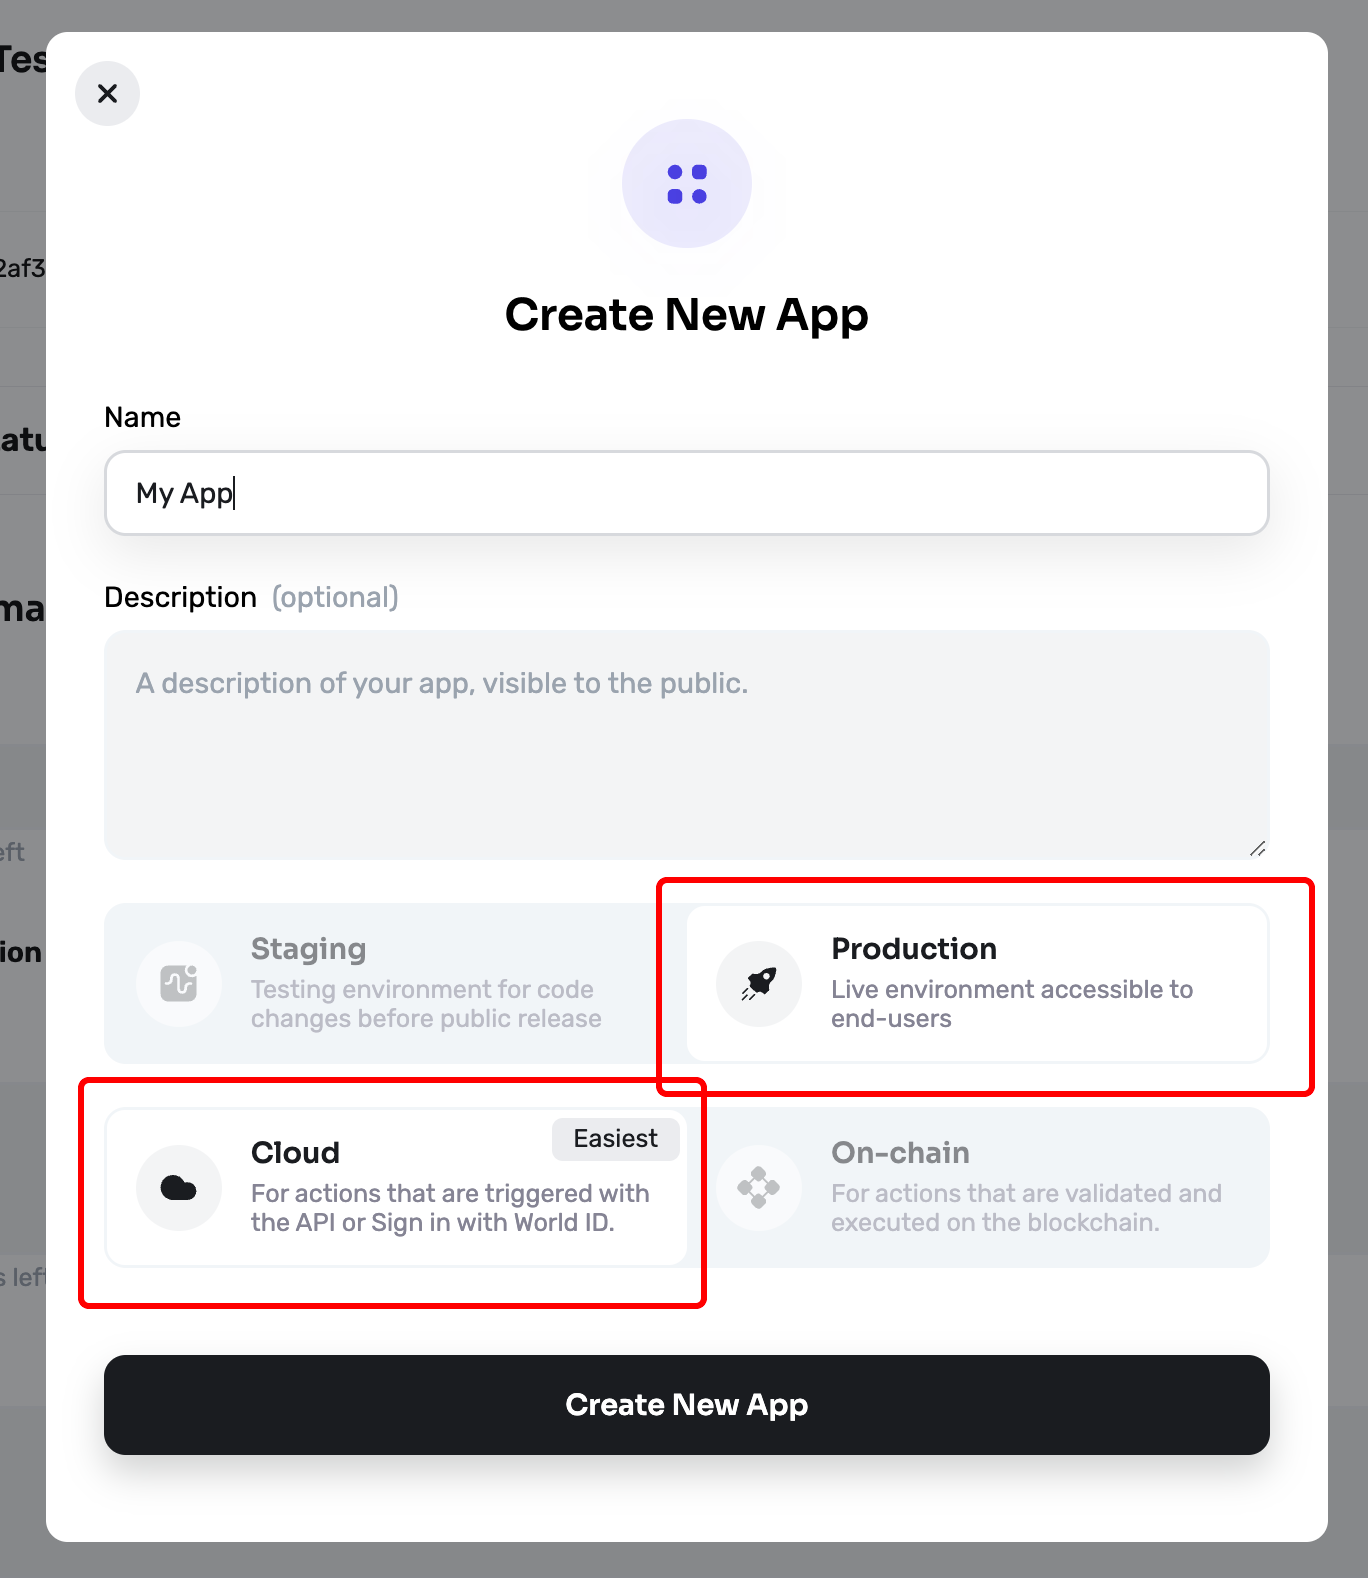
When creating your World ID App, choose “Production” and “Cloud”:
After you create your World ID App ID, we’ll need to create a World ID incognito action. Set the Action Identifer to auth and set the Maximum Verifications Per Person to Unlimited.
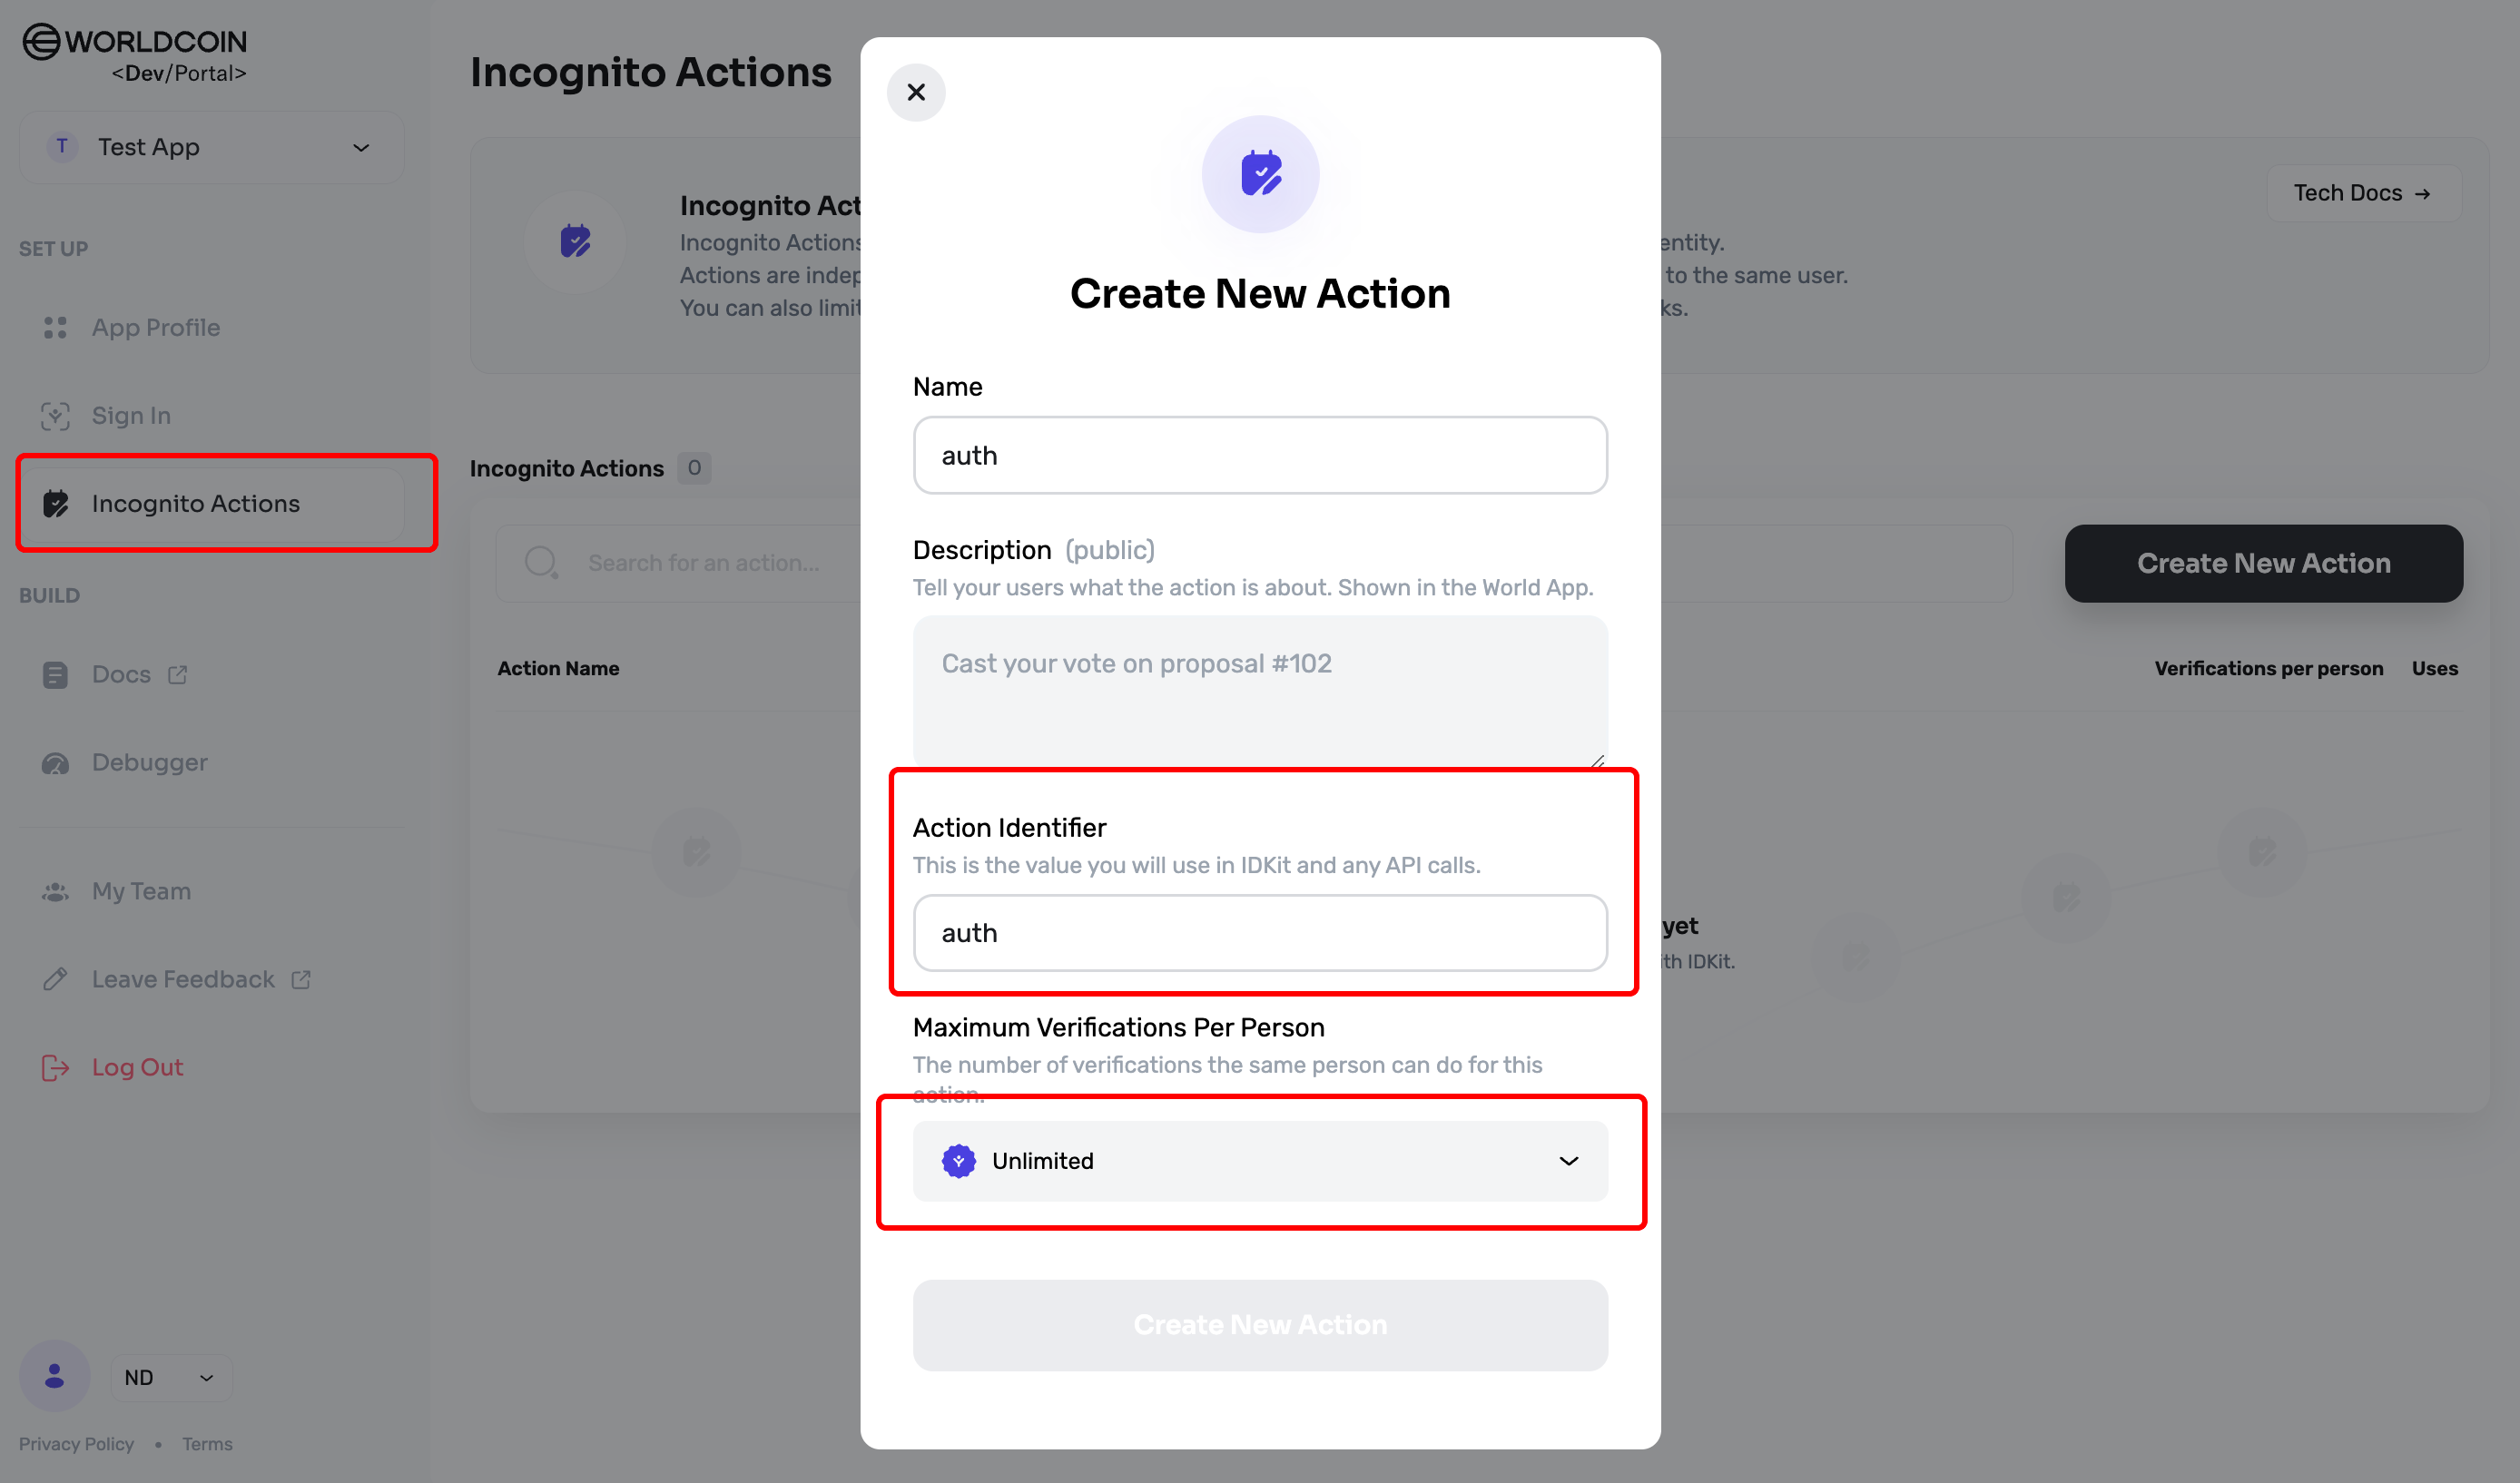
We’ll be using both the App ID as well as the action later when we configure our environment variables.
Project setup
To get started, create a new Next.js app using the Next.js CLI:
npx create-next-app worldid-app

✔ Would you like to use TypeScript? Yes
✔ Would you like to use ESLint? Yes
✔ Would you like to use Tailwind CSS? Yes
✔ Would you like to use `src/` directory? No
✔ Would you like to use App Router? Yes
✔ Would you like to customize the default import alias (@/*)? No
Next, change into the new directory and install the following dependencies using npm, yarn, bun, or your favorite package manager:
npm install @worldcoin/idkit @airstack/node connectkit wagmi viem@2.x @tanstack/react-query next-themesNext, add the following to tsconfig.json to disable the noImplicitAny TypeScript rule for the purposes of this tutorial:
"compilerOptions": {
  ...
  "noImplicitAny": false
}
Finally, initialize ShadCN UI:
npx shadcn-ui@latest init

✔ Which style would you like to use? › New York
✔ Which color would you like to use as base color? › Slate
✔ Would you like to use CSS variables for colors? yes
Now, install the following three components using the ShadCN UI CLI:
npx shadcn-ui@latest add button sonner separatorEnvironment variables
Create a file named .env.local and add the following values:
AIRSTACK_API_KEY="your-airstack-api-key"
NEXT_PUBLIC_WALLETCONNECT_PROJECT_ID="your-walletconnect-project-id"

# WorldCoin ID Action Name
NEXT_PUBLIC_WC_ACTION="auth"

# Worldcoin ID App Name
# Remove "_app" from the WorldCoin App ID before setting
NEXT_PUBLIC_WLD_APP_ID="your-worldcoin-app-id"
API Routes
Next, we’ll create our API routes. These will be the back end API endpoints that we’ll be using to interact with the World ID API and the Airstack API.
World ID verification
The first route we’ll create is for verifying a user using the World ID API.
Create a folder in the app directory named verify. In the verify directory create a file named route.ts and add the following code:
//  app/api/verify/route.ts
import { NextResponse, NextRequest } from "next/server"

const endpoint = `https://developer.worldcoin.org/api/v1/verify/app_${process.env.NEXT_PUBLIC_WLD_APP_ID}`

export async function POST(req:NextRequest) {
  const body = await req.json()
  const reqBody = {
    merkle_root: body.merkle_root,
    nullifier_hash: body.nullifier_hash,
    proof: body.proof,
    verification_level: body.verification_level,
    signal: body.signal ?? "",
    action: process.env.NEXT_PUBLIC_WC_ACTION
  }

  const verifyRes = await fetch(endpoint, {
    method: "POST",
    headers: {
      "Content-Type": "application/json",
    },
    body: JSON.stringify(reqBody)
  })
  const wldResponse = await verifyRes.json()
  if (verifyRes.status == 200) {
    return NextResponse.json({ code: "success", wldResponse });
  } else {
    return NextResponse.json({ code: "failure", wldResponse });
  }
}
This route verifies the API call coming from the client, which includes the proof, nullifier hash, and merkle root. *see definition of types here.
The action is the action that was configured earlier, which allows this verification to be executed an unlimited number of times.
The signal is a string to be included in the zero-knowledge proof. This is typically used for on-chain actions, and we are optionally passing in a wallet address which could be verified on the server along with a signature for anything you’d like to do on-chain.
User lookup
We have an optional route at /api/get-user that calls the Airstack API with the user’s address to find out if they hold any web3 social accounts, if they do we can address them by their on-chain social profile name.
//  app/api/get-user/route.ts

import { NextRequest, NextResponse } from 'next/server'
import { init, fetchQuery } from "@airstack/node";

init(process.env.AIRSTACK_API_KEY || '')

export async function POST(req: NextRequest) {
  try {
    const { address } = await req.json()
    const query = `
      query GetAllSocials {
        Socials(
          input: {filter: {userAssociatedAddresses: {_eq: "${address}"}}, blockchain: ethereum}
        ) {
          Social {
            blockchain
            dappName
            profileName
            userAssociatedAddresses
            userId
            userCreatedAtBlockTimestamp
          }
        }
      }
    `
    const { data, error } = await fetchQuery(query)
    return NextResponse.json({ data, error})
  } catch (error) {
    console.log('error', error)
    return NextResponse.json({ error})
  }
}
Building the UI
We’re going to build the UI with some nice features like a light/dark mode as well as responsive styling using Tailwind breakpoints. Bear with me as this we will be working across quite a few files.
components/theme-provider.tsx
This lets us set up light / dark themeing
"use client"

import * as React from "react"
import { ThemeProvider as NextThemesProvider } from "next-themes"
import { type ThemeProviderProps } from "next-themes/dist/types"

export function ThemeProvider({ children, ...props }: ThemeProviderProps) {
  return <NextThemesProvider {...props}>{children}</NextThemesProvider>
}
components/mode-toggle.tsx
Lets us toggle between light and dark mode. This button will live in our nav.
"use client"

import * as React from "react"
import { MoonIcon, SunIcon } from "@radix-ui/react-icons"
import { useTheme } from "next-themes"

import { Button } from "@/components/ui/button"


export function ModeToggle() {
  const { setTheme, theme } = useTheme()
  const nextTheme = theme === "light" ? "dark" : "light"

  return (
    <Button onClick={() => setTheme(nextTheme)} variant="outline" size="icon" className="rounded-full">
      {
        theme === 'light' ? <SunIcon className="h-[1.2rem] w-[1.2rem] rotate-0 scale-100 transition-all dark:-rotate-90 dark:scale-0" /> : <MoonIcon className="absolute h-[1.2rem] w-[1.2rem] rotate-90 scale-0 transition-all dark:rotate-0 dark:scale-100" />
      }
    </Button>
  )
}
components/connectkit-provider.tsx
This is where we configure Wagmi and ConnectKit
'use client'
import { WagmiProvider, createConfig } from "wagmi";
import { ConnectKitProvider as Provider, getDefaultConfig } from "connectkit";
import { QueryClient, QueryClientProvider } from "@tanstack/react-query";

const config = createConfig(
  getDefaultConfig({
    walletConnectProjectId: process.env.NEXT_PUBLIC_WALLETCONNECT_PROJECT_ID || "",
    appName: "WorldCoin ID Connect",
  }),
);

const queryClient = new QueryClient();

export const ConnectKitProvider = ({ children }: { children: any }) => {
  return (
    <WagmiProvider config={config}>
      <QueryClientProvider client={queryClient}>
        <Provider>
          {children }
        </Provider>
      </QueryClientProvider>
    </WagmiProvider>
  );
};
app/context.ts
This is the global state that we’ll be using in our app. This includes the user’s wallet address, social profile, and a function to set their profile (all optional as they can opt for only World ID verification).
import { createContext } from 'react'

export const AppContext = createContext({
  address: '',
  profile: null,
  setProfile: () => null,
})
app/context-provider.tsx
This is the component that allows us to update and manage the global state configured in app/context.ts
'use client'
import { AppContext } from './context'
import { useAccount } from "wagmi"
import { useState, useEffect } from 'react'

export function ContextProvider ({ children }) {
  const { address } = useAccount()
  const [profile, setProfile] = useState<any>(null)
  const [verified, setVerified] = useState(false)

  useEffect(() => {
    if (address) fetchProfile()
  }, [address])

  async function fetchProfile() {
    try {
     const response = await fetch('/api/get-user', {
      method: 'POST',
      body: JSON.stringify({ address }),
     }).then((res) => res.json())
     if (response?.data?.Socials?.Social) {
        setProfile(response.data.Socials.Social[response.data.Socials.Social.length - 1])
     } else {
      setProfile({
        profileName: address
      })
     }
    } catch (err) {
      console.log('error fetching profile', err)
    }
  }

  return (
    <AppContext.Provider
      value={{
        address,
        profile,
        setProfile,
        setVerified,
        verified
      } as any }
    >
      {children}
    </AppContext.Provider>
  )
}
app/nav.tsx
This is the navigation bar.
'use client'
import Image from 'next/image'
import Link from 'next/link'
import { ModeToggle } from '@/components/mode-toggle'
import { AppContext } from './context'
import { useContext, useState, useEffect } from 'react'
import { Button } from '@/components/ui/button'
import { useDisconnect } from 'wagmi'
import { GitHubLogoIcon } from '@radix-ui/react-icons'
export function Nav() {
  const [isClient, setIsClient] = useState(false)
  const { address, setProfile, setVerified, verified } = useContext<any>(AppContext)
  const { disconnect } = useDisconnect()
  useEffect(() => {
    setIsClient(true)
  }, [])
  if (!isClient) return null
  return (
    <div
      className="flex border-b px-6 py-3"
    >
      <div className='flex flex-1 items-center'>
        <Link href="/">
          <div className='flex items-center'>
            <Image
              src="/worldcoin.svg"
              width={40}
              className="dark:invert"
              height={40}
              alt="Worldcoin Logo"
            />
              <p className='md:ml-1 text-sm'>
              <span className='font-bold'>World</span> Auth
            </p>
          </div>
        </Link>
        <Link
          href="https://worldcoin.org/world-id"
          target="_blank"
          rel="noopener noreferrer"
        >
          <p
            className='
            hover:text-foreground md:ml-8
            ml-5 text-sm text-muted-foreground
            '
          >
            Learn More
          </p>
        </Link>
        <Link
          href="https://github.com/dabit3/worldid-auth"
          target='_blank'
          rel="noopener noreferrer"
        >
          <GitHubLogoIcon
            className="md:ml-8 ml-5 hover:text-foreground text-muted-foreground"
          />
        </Link>
      </div>
      <div className='flex items-center'>
        {
          (verified || address) && (
            <Button onClick={
              () => {
                disconnect()
                setProfile(null)
                setVerified(false)
              }
            } className='text-xs' variant='link'>
              Disconnect
            </Button>
          )
        }
        <ModeToggle />
      </div>
    </div>
  )
}
For the WorldCoin logo, create worldcoin.svg in the public folder and add this:
<?xml version="1.0" encoding="utf-8"?>
<!-- Generator: Adobe Illustrator 26.4.1, SVG Export Plug-In . SVG Version: 6.00 Build 0)  -->
<svg version="1.1" id="katman_1" xmlns="http://www.w3.org/2000/svg" xmlns:xlink="http://www.w3.org/1999/xlink" x="0px" y="0px"
	 viewBox="0 0 445.2 315.2" style="enable-background:new 0 0 445.2 315.2;" xml:space="preserve">
<path
class="st0" d="M327.6,115.2c-3-7.5-6.8-14.6-11.3-21.3c-20.3-30-54.7-49.7-93.6-49.7c-62.4,0-112.9,50.6-112.9,112.9
	c0,62.4,50.6,113,112.9,113c39,0,73.3-19.7,93.6-49.7c4.5-6.6,8.2-13.7,11.3-21.2c5.2-13,8.1-27.2,8.1-42
	C335.6,142.4,332.8,128.2,327.6,115.2z M312.5,145.7H183.2c2-7,5.7-13.2,10.7-18.1c7.6-7.6,18.1-12.3,29.7-12.3H303
	C307.9,124.6,311.1,134.8,312.5,145.7z M222.1,66.1c25.7,0,49,10.7,65.6,27.9h-61.3c-17.5,0-33.3,7.1-44.7,18.5
	c-8.9,8.9-15.1,20.3-17.4,33.2h-32.5C137.4,100.8,175.7,66.1,222.1,66.1z M222.1,248.4c-46.4,0-84.7-34.7-90.4-79.6h32.5
	c5.4,29.4,31.2,51.7,62.2,51.7h61.3C271.2,237.7,247.9,248.4,222.1,248.4z M223.6,199.3c-19.2,0-35.4-12.9-40.4-30.5h129.3
	c-1.4,10.9-4.7,21.1-9.5,30.5H223.6z"/>
</svg>
app/layout.tsx
This is the component that configures the nav, global state, and providers we’ve created and passes everything down to be available in our routes. You can think of this as the entrypoint to our app.
import type { Metadata } from 'next'
import { Inter } from 'next/font/google'
import { Nav } from './nav'
import { ConnectKitProvider } from '@/components/connectkit-provider'
import { ThemeProvider } from "@/components/theme-provider"
import { ContextProvider } from './context-provider'
import './globals.css'

const inter = Inter({ subsets: ['latin'] })
export const metadata: Metadata = {
  title: 'World ID Auth',
  description: 'Example of World ID device authentication',
}

export default function RootLayout({
  children,
}: {
  children: React.ReactNode
}) {
  return (
    <html lang="en" suppressHydrationWarning>
      <body className={inter.className} style={{ height: 'calc(100vh - 60px)' }}>
        <ThemeProvider
          attribute="class"
          defaultTheme="dark"
          enableSystem
          disableTransitionOnChange
        >
          <ConnectKitProvider>
            <ContextProvider>
              <Nav />
              {children}
            </ContextProvider>
          </ConnectKitProvider>
        </ThemeProvider>
      </body>
    </html>
  )
}
app/page.tsx
The last component we need to set up is the main view, located at app/page.tsx.
This is a large file, you can also view the code here on GitHub
This component is the only route we’ll be rendering in our app, and contains all of the functionality we’ll need to make this work.
'use client'
import { CubeIcon } from '@radix-ui/react-icons'
import { Button } from '@/components/ui/button'
import { Separator } from '@/components/ui/separator'
import { useModal } from "connectkit"
import { useAccount } from "wagmi";
import { useState, useEffect, useContext, useRef } from 'react'
import { IDKitWidget, VerificationLevel } from '@worldcoin/idkit'
import { Toaster } from "@/components/ui/sonner"
import { toast } from "sonner"
import { AppContext } from './context'
import Link from 'next/link'
export default function Home() {
const { address } = useAccount()
const [isLoaded, setIsLoaded] = useState(false)
const { setOpen } = useModal()
const { profile, verified, setVerified } = useContext<any>(AppContext)
const buttonRef = useRef<any>(null)
useEffect(() => {
setIsLoaded(true)
}, [])
useEffect(() => {
if (address && !verified) {
buttonRef.current?.click()
}
}, [address])
async function handleVerify(data: any) {
data.signal = address
const response = await fetch('/api/verify', {
method: 'POST',
headers: {
'Content-Type': 'application/json'
},
body: JSON.stringify(data)
}).then(res => res.json())
if (response.code === 'success') {
setVerified(true)
toast("Successfully authenticated with World ID.")
} else {
toast("Authenticated failed with World ID.")
console.log('error:', response.wldResponse)
}
}
if (!isLoaded) return null
return (
<main className="
p-4 sm:p-12 flex flex-1 h-full">
<div className="
rounded-xl border flex-col md:flex-row flex flex-1
">
<div
className='
p-6 sm:p-8 rounded-tl-xl rounded-tr-xl md:rounded-tr-none
md:rounded-tl-xl md:rounded-bl-xl flex flex-1 bg-secondary-100 bg-zinc-900'
>
<div className='flex items-start flex-col'>
<div className='flex justify-center flex-1 '>
<CubeIcon
className='w-7 h-7 text-white' />
<p className='
text-white
ml-3 text-lg'>Acme Inc</p>
</div>
<div>
<p className='text-white'>
Sybil-resistant identity verification powered by <Link rel='no-opener' target="_blank" href="https://docs.worldcoin.org/">World ID</Link>.
</p>
</div>
</div>
</div>
{
verified && (
<div
className='
border-l items-center justify-center
flex flex-1 flex-col p-6 sm:p-8 '
>
<p>
🎉 Successfully authenticated with World ID.
</p>
{
address && profile && (
<p className='text-sm mt-3 text-muted-foreground'>
welcome, {profile.profileName}
</p>
)
}
</div>
)
}
{
!verified && (
<div
className='
md:rounded-bl-none rounded-bl-xl border-l
items-center justify-center flex flex-1 flex-col p-6 sm:p-8 '
>
<div className='flex flex-col items-center'>
<p className='font-medium text-2xl'>Login or create account</p>
<p className='text-sm text-muted-foreground mt-2'>
Connect and verify with World ID.
</p>
</div>
<div className='mt-5 flex flex-col'>
<IDKitWidget
app_id={`app_${process.env.NEXT_PUBLIC_WLD_APP_ID}`}
action={process.env.NEXT_PUBLIC_WC_ACTION || ''}
onSuccess={(message) => console.log(message)}
handleVerify={handleVerify}
signal={address}
verification_level={VerificationLevel.Device}
>
{({ open }) => (
<Button
ref={buttonRef}
className='w-[290px] sm:w-[320px] '
onClick={open}
>Verify with World ID</Button>
)}
</IDKitWidget>
{
!address && (
<>
<div className='relative py-4'>
<Separator
className='
mt-6 absolute inset-0 flex items-center
'
/>
<div className='
relative flex justify-center text-xs uppercase
'>
<p className='
bg-background px-2 text-muted-foreground
'>
or
</p>
</div>
</div>
<Button
onClick={() => setOpen(true)}
variant="outline" className='
w-[290px] sm:w-[320px]
rounded-lg'>
Verify with Wallet & World ID
</Button>
</>
)
}
<Link
href="https://apps.apple.com/no/app/world-app-worldcoin-wallet/id1560859847"
target='_blank'
rel='noopener noreferrer'
>
<p className='
text-muted-foreground text-xs mt-4 text-center
'>
Get the WorldID App ->
</p>
</Link>
</div>
</div>
)
}
</div>
<Toaster />
</main>
)
}The main thing to call out in the above code is the IDKitWidget component.

This is the component that renders and configures our interaction with our server. The handleVerify function is what you should look at to understand how the API call and the response are handled.
Testing it out
That’s it! You should be able to test it out by running npm run dev.